Terraform Cloud is the managed service offering of Terraform by HashiCorp, and it is a great tool that provides a remote execution environment that is optimized for the Terraform workflow; some of its great advantages is that it manages state files in the cloud (vs. having to do it yourself in S3 buckets, etc.), and it allows bigger teams to collaborate safely and efficiently.
Providing the proper permissions for Terraform Cloud to provision resources in your AWS accounts is very basic configuration you will need in this setup, and the proper way to do this is through OpenID Connect (more on that below), but we were surprised to find out that Google searches “terraform cloud aws openid connect” and “terraform cloud aws oidc” do not take you to the right documentation!, so we decided to write about it and take the opportunity for a small walkthrough 😉
There are two ways you can allow Terraform Cloud to provision resources in your AWS accounts:
Method 1: IAM User and Why You Shouldn’t
This is the easiest way but it is not considered a good practice, you create an IAM user, generate an Access Key and Secret Access Key (programmatic access), and set those as environment variables in your Terraform Cloud workspace (or shared through a Variable Set) with the names “AWS_ACCESS_KEY_ID” and “AWS_SECRET_ACCESS_KEY“.
The problem with this approach is that it leverages long-lived static credentials to access your AWS accounts, which can lead to security breaches if those static credentials were leaked down the road.
Method 2: OpenID Connect (OIDC), the Proper Way
This is the recommended way, OpenID Connect is an authentication protocol that works on top of the OAuth 2.0 framework, and it is based on a two-way trust relationship pre-established between the parties (in this case Terraform Cloud and AWS) to dynamically generate credentials when they are needed.
An OpenID Connect setup is much more secure, and the following are the steps to configure it for Terraform Cloud and AWS:
Step 1: Create an OIDC Identity Provider in AWS (IAM)
In your AWS account:
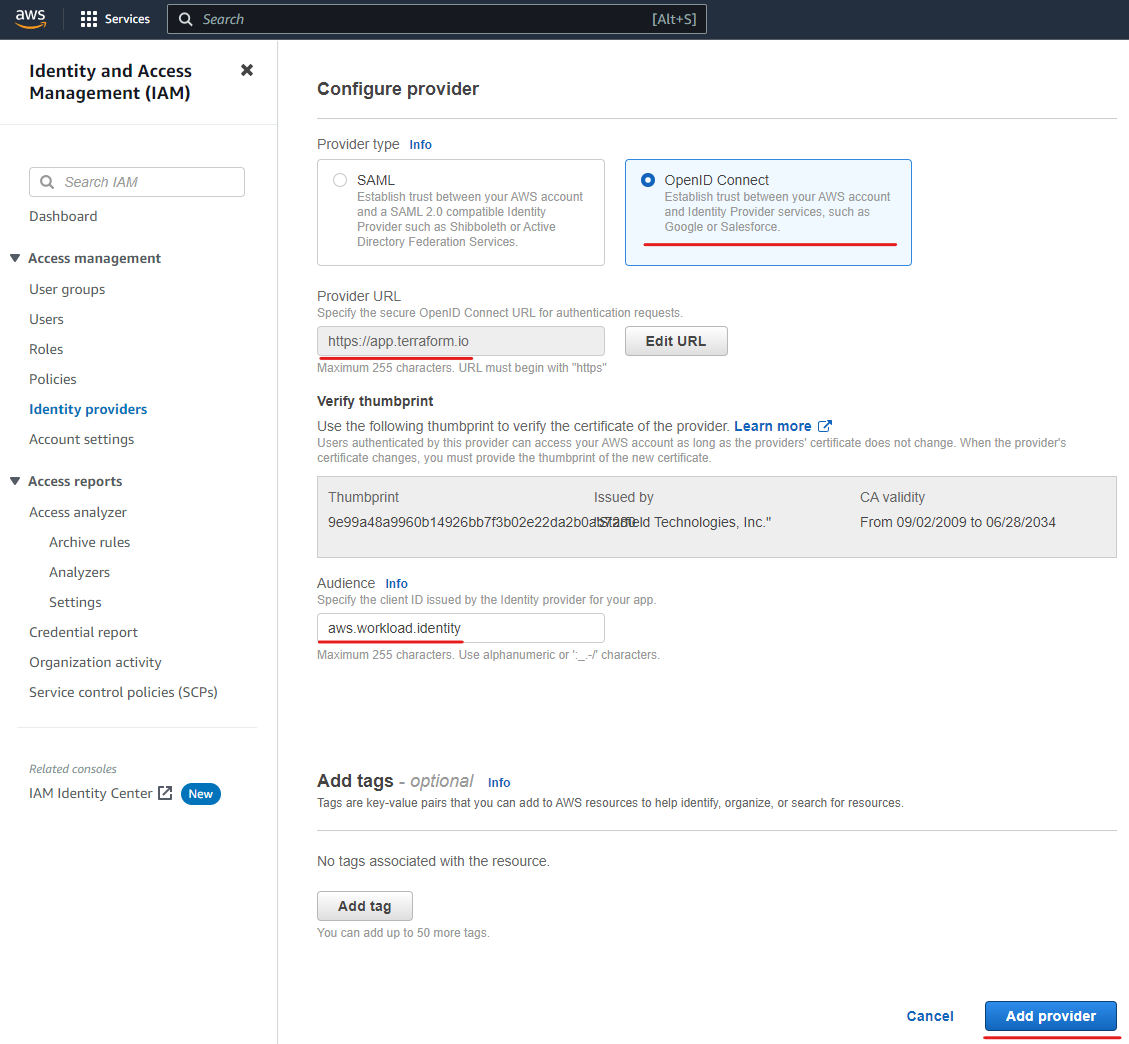
- Go to IAM > Identity providers and click on “Add provider”
- In the “Add an Identity provider” screen:
- Select “OpenID Connect”
- For “Provider URL”, set it to “https://app.terraform.io”
- Click on the button “Get thumbprint” right after, a box with the thumbprint and CA information should come up
- For the “Audience” field, set it to “aws.workload.identity”, this is the default that Terraform Cloud will provide when authenticating, but it can be customized if you require it, you just need to make sure you do on both sides so they match
- Finally click on the “Add provider” button to submit


Step 2: Configure a Role and Trust Policy in AWS
Next, we need the role that Terraform Cloud will assume if authentication is successful, you can associate a particular subset of permissions for the role following the “principle of the least privilege” (only provide the exact permissions a principal will need to perform their job and nothing more).
To create the required role and associated trust policy:
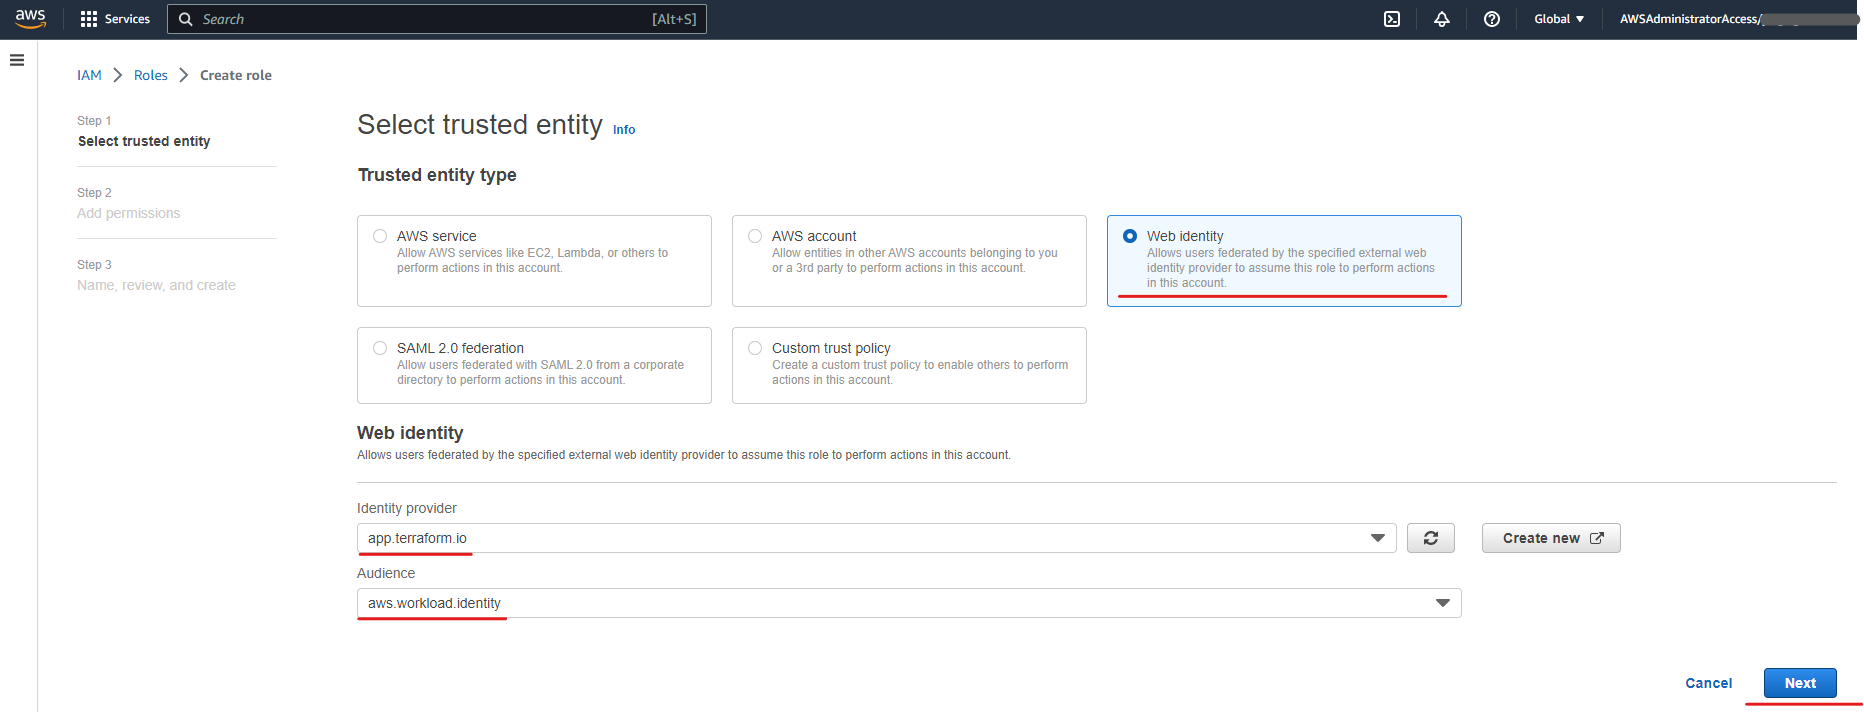
- Go to IAM > Roles and click on “Create role”
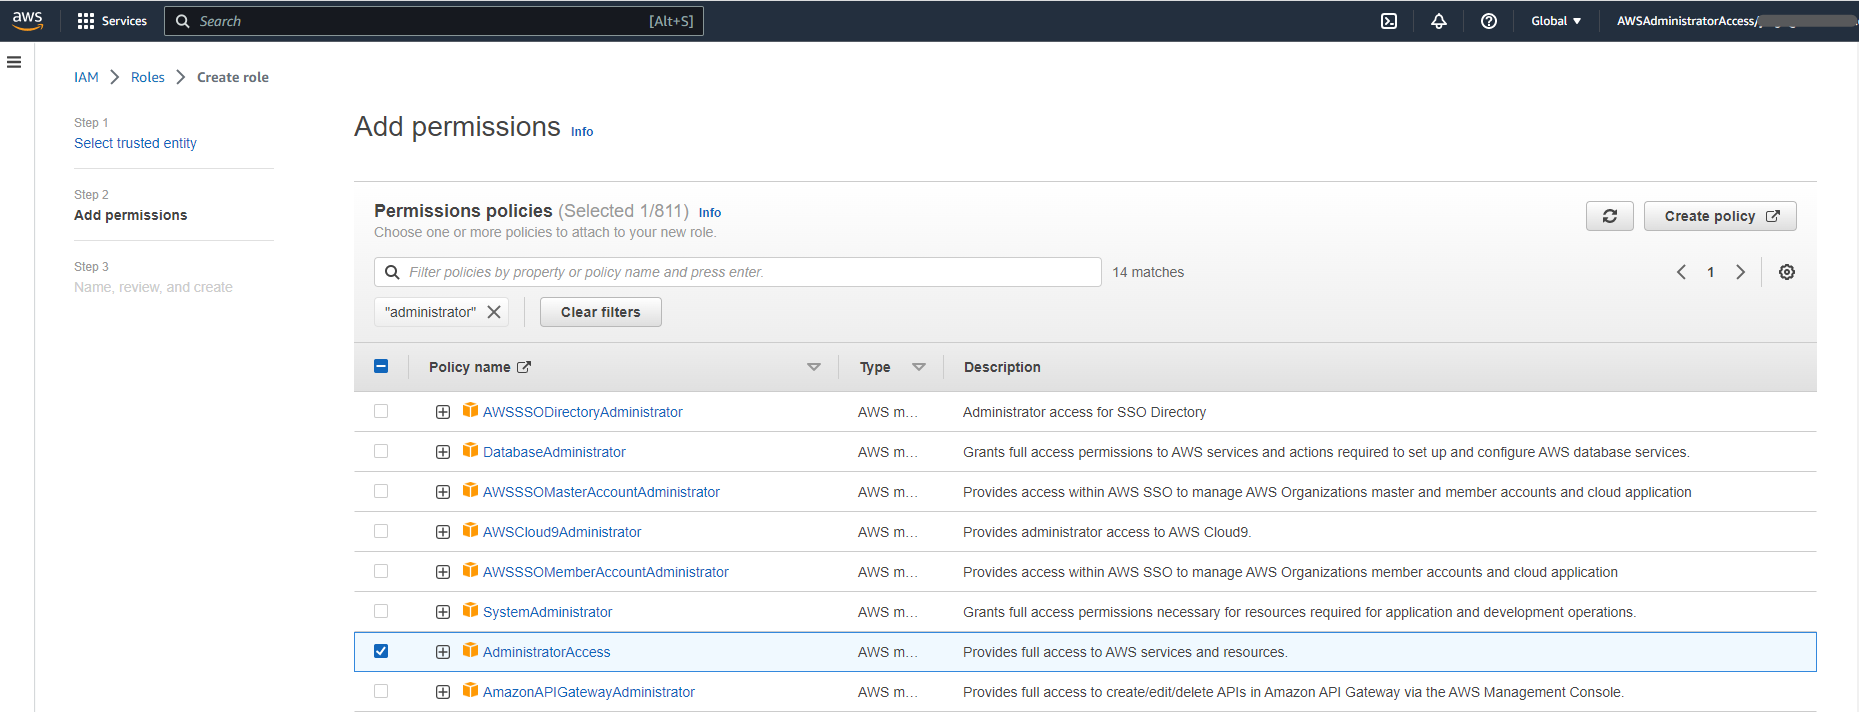
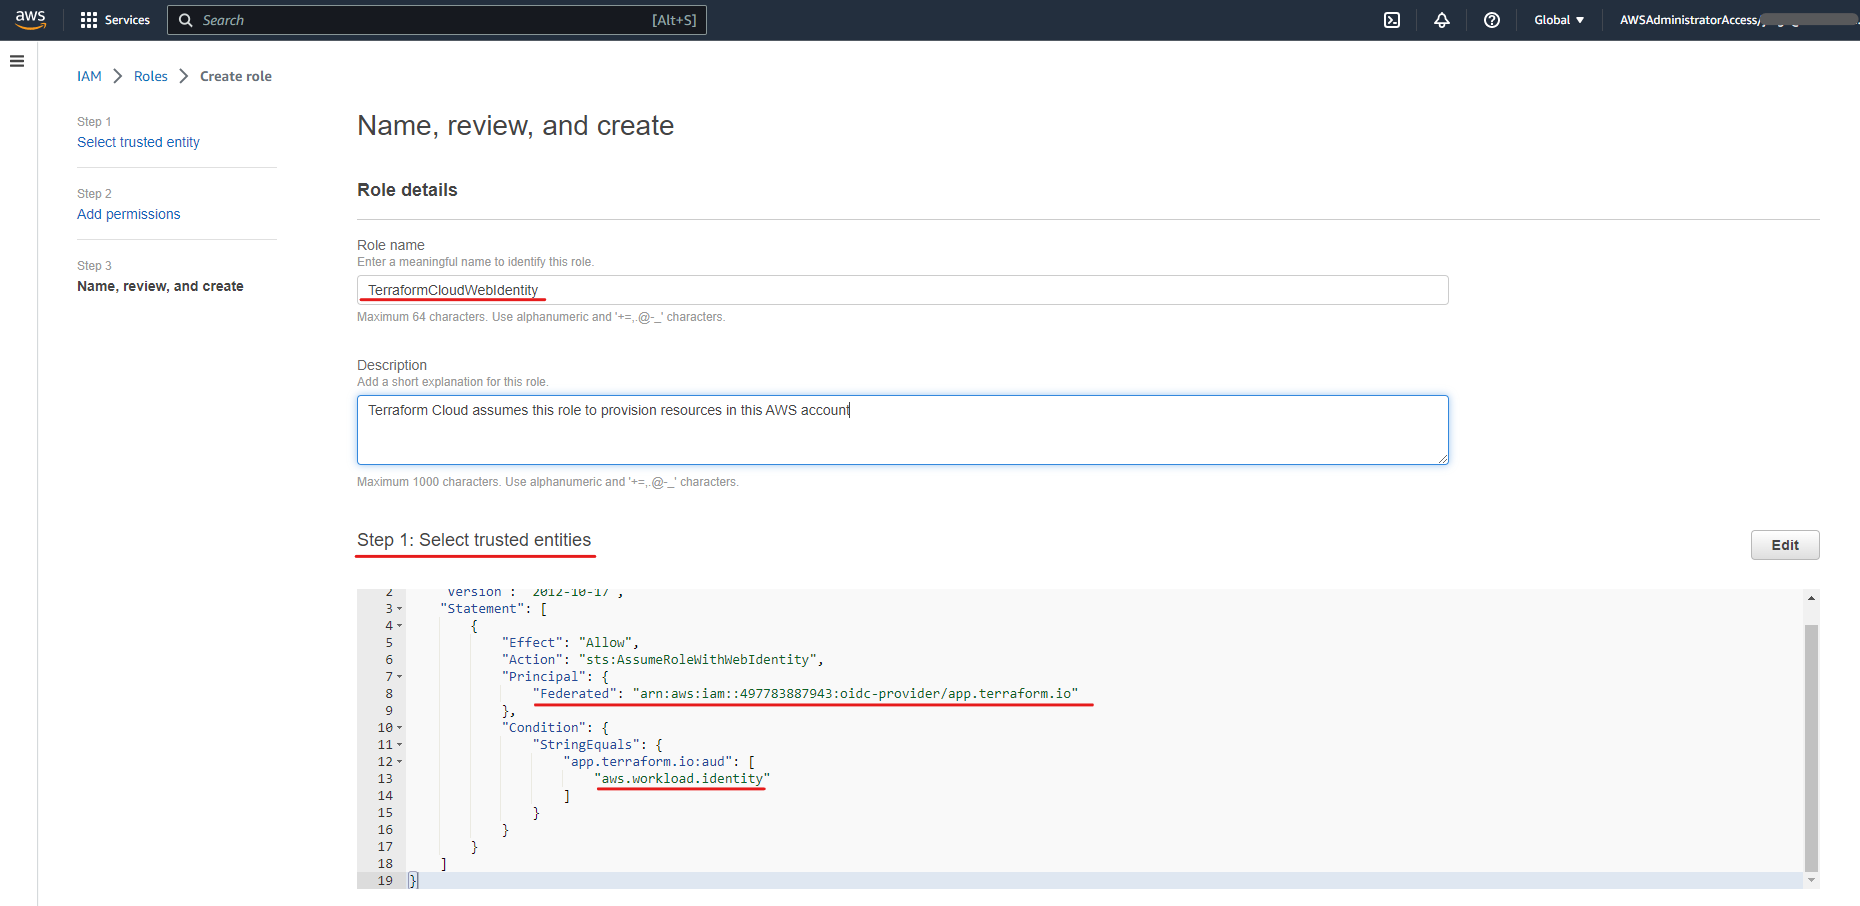
- Then, follow the screens to:
- In the “Select trusted entity” screen, pick the “Web identity” option, and select “app.terraform.io” and “aws.workload.identity” for the “Identity provider” and “Audience” fields respectively.
- Add permissions in the next screen.
- Finally, provided a meaningful name for your new role, and click “Create role”.
- Once the new role has been created, copy its ARN so it can be entered on the Terraform Cloud side.


Step 3: Add Environment Variables to Terraform Cloud
Next, we need to instruct Terraform Cloud to assume the new role via OIDC, and we to this through setting a couple of environment variables:
| Environment Variable Name | Description |
|---|---|
| TFC_AWS_PROVIDER_AUTH | As the Terraform Cloud documentation explains it: Must be present and set to “true”, or Terraform Cloud will not attempt to authenticate to AWS |
| TFC_AWS_RUN_ROLE_ARN | This is the ARN of the role that Terraform Cloud needs to assume |
| AWS_DEFAULT_REGION | The default region that the AWS provider will use if no other is explicitly specified |
The following is how the environment variables look in a Terraform Cloud variable set:
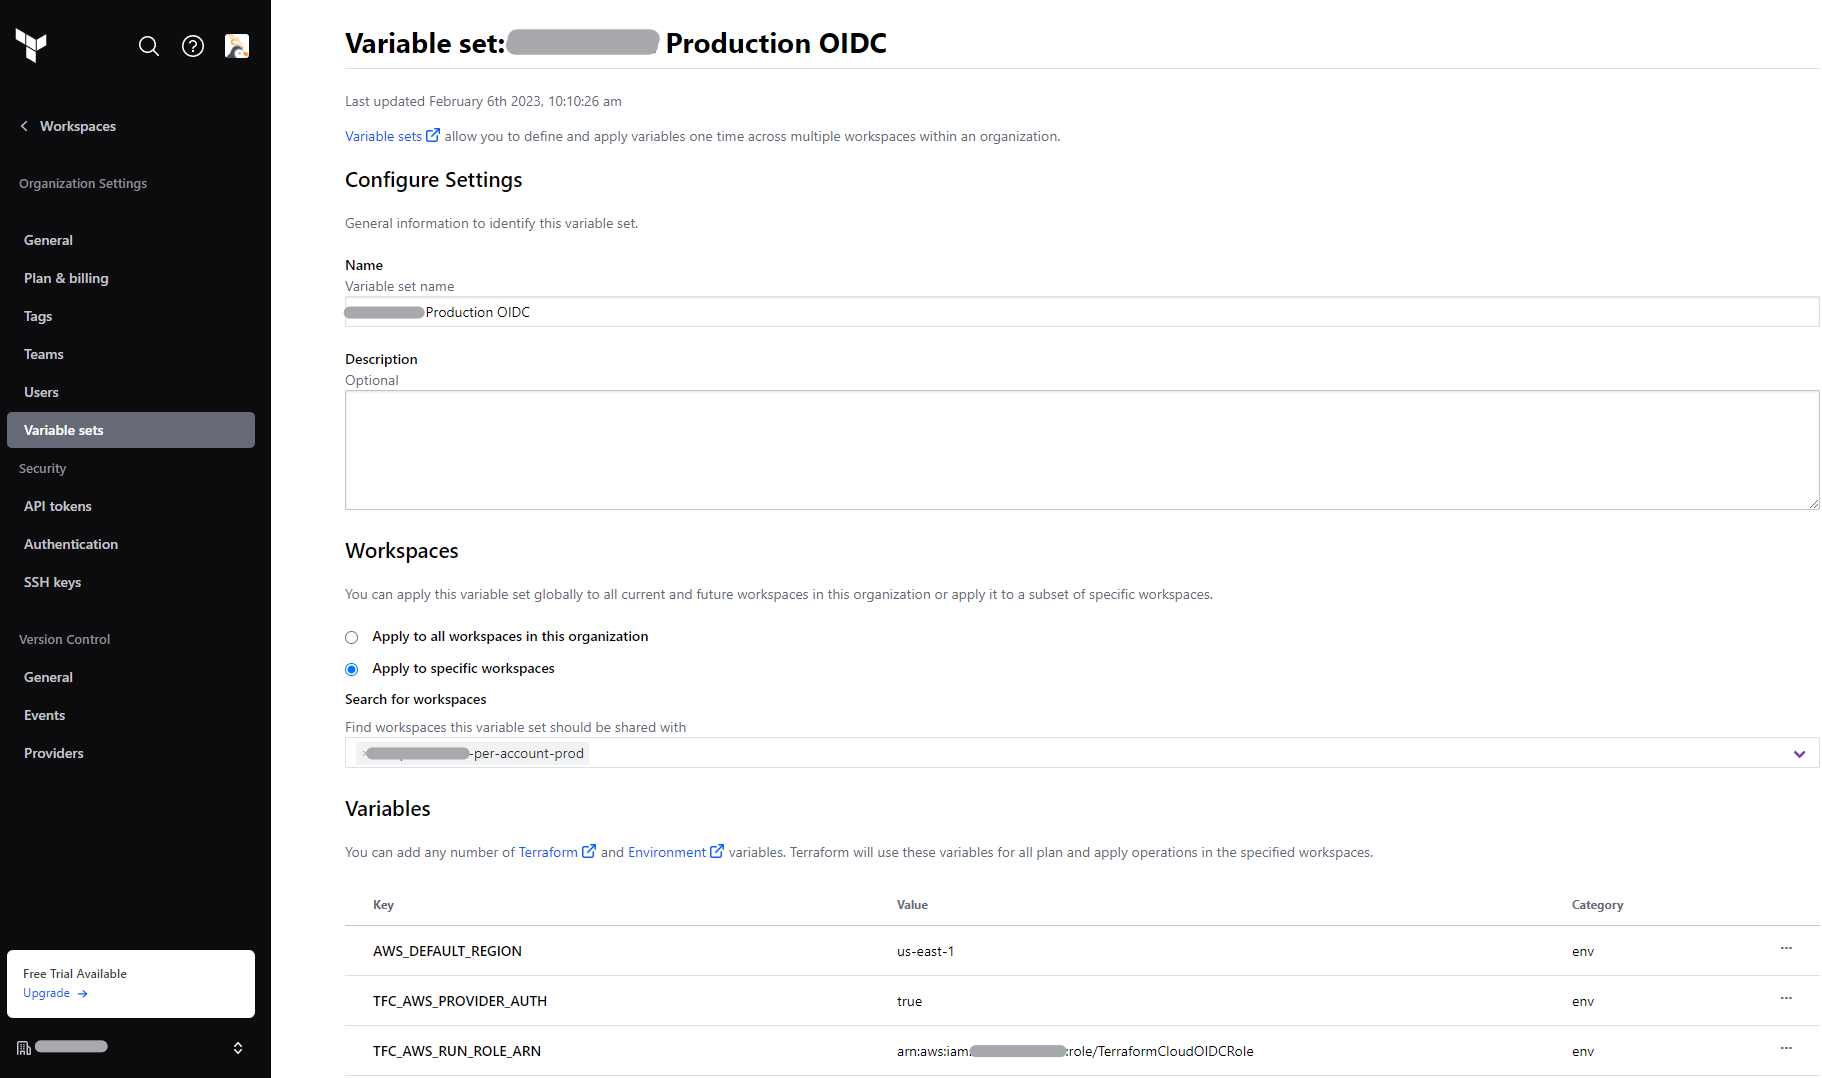
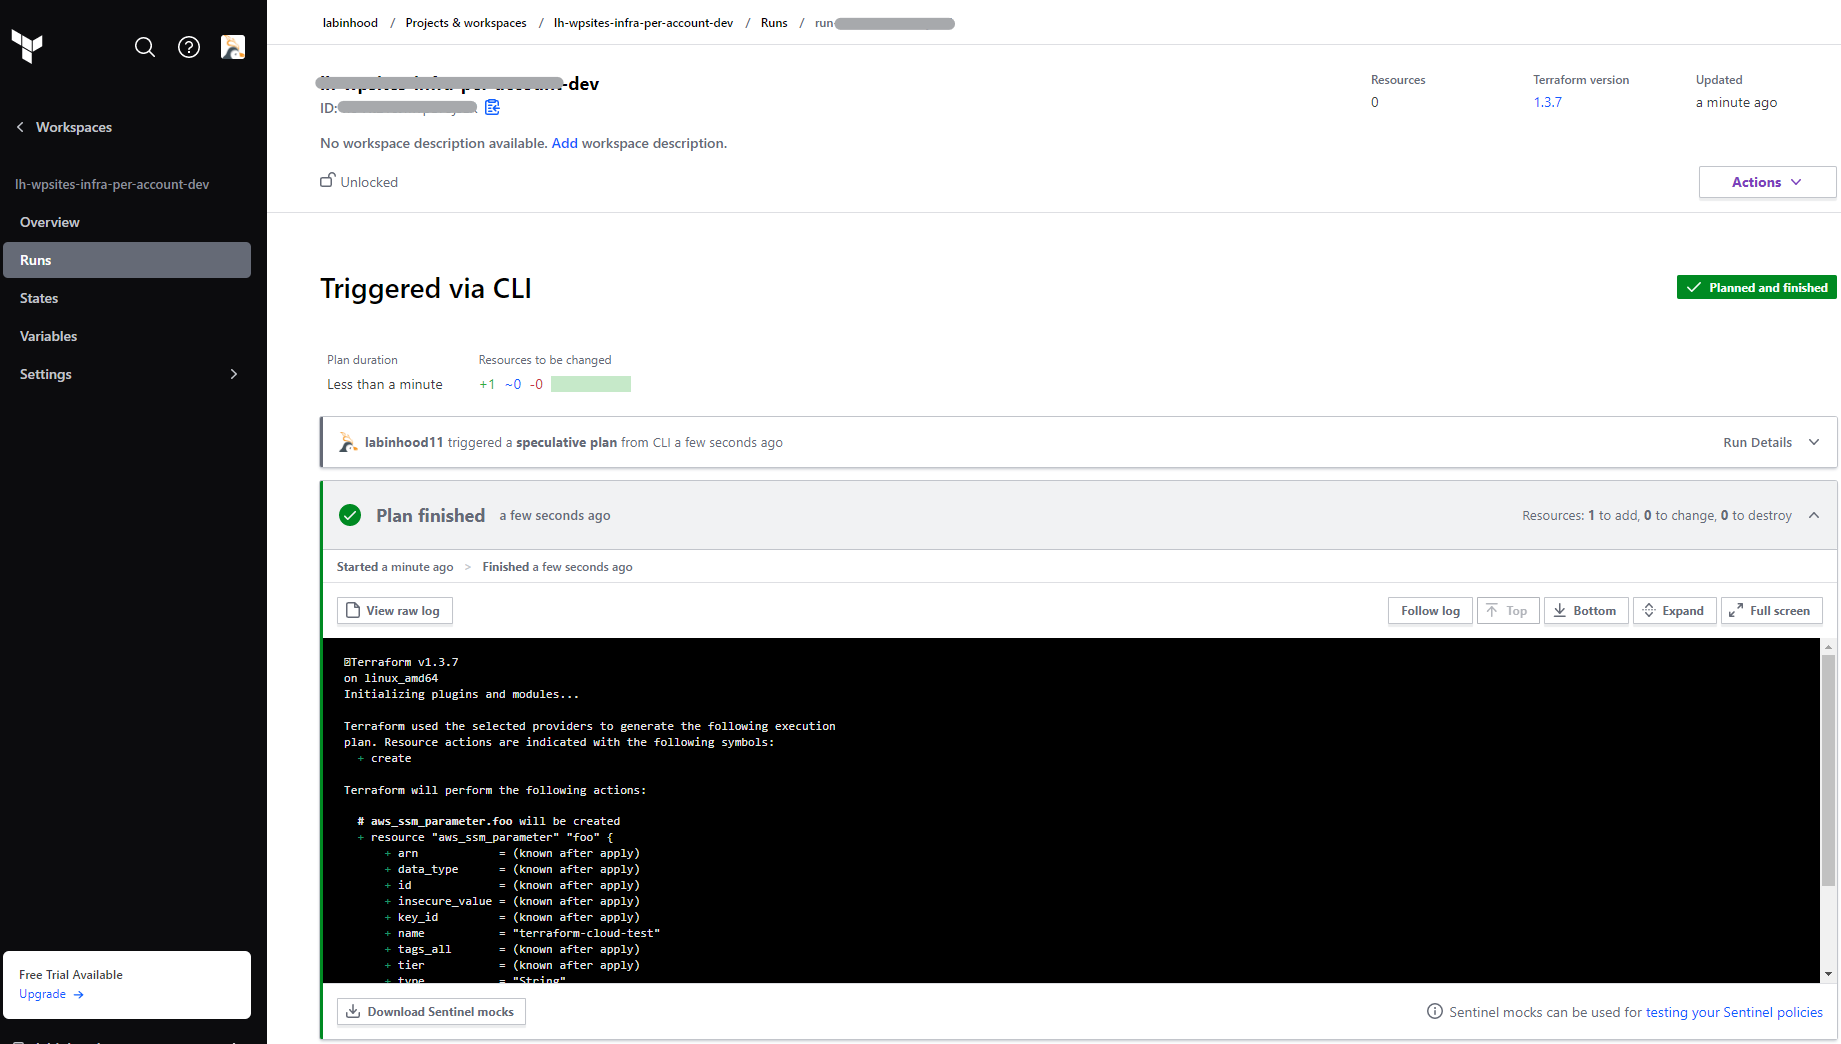
Finally, once the environment variables or variable set has been associated with your workspace, you can run “plan” or “apply” operations from your workspace, and it should simply work!
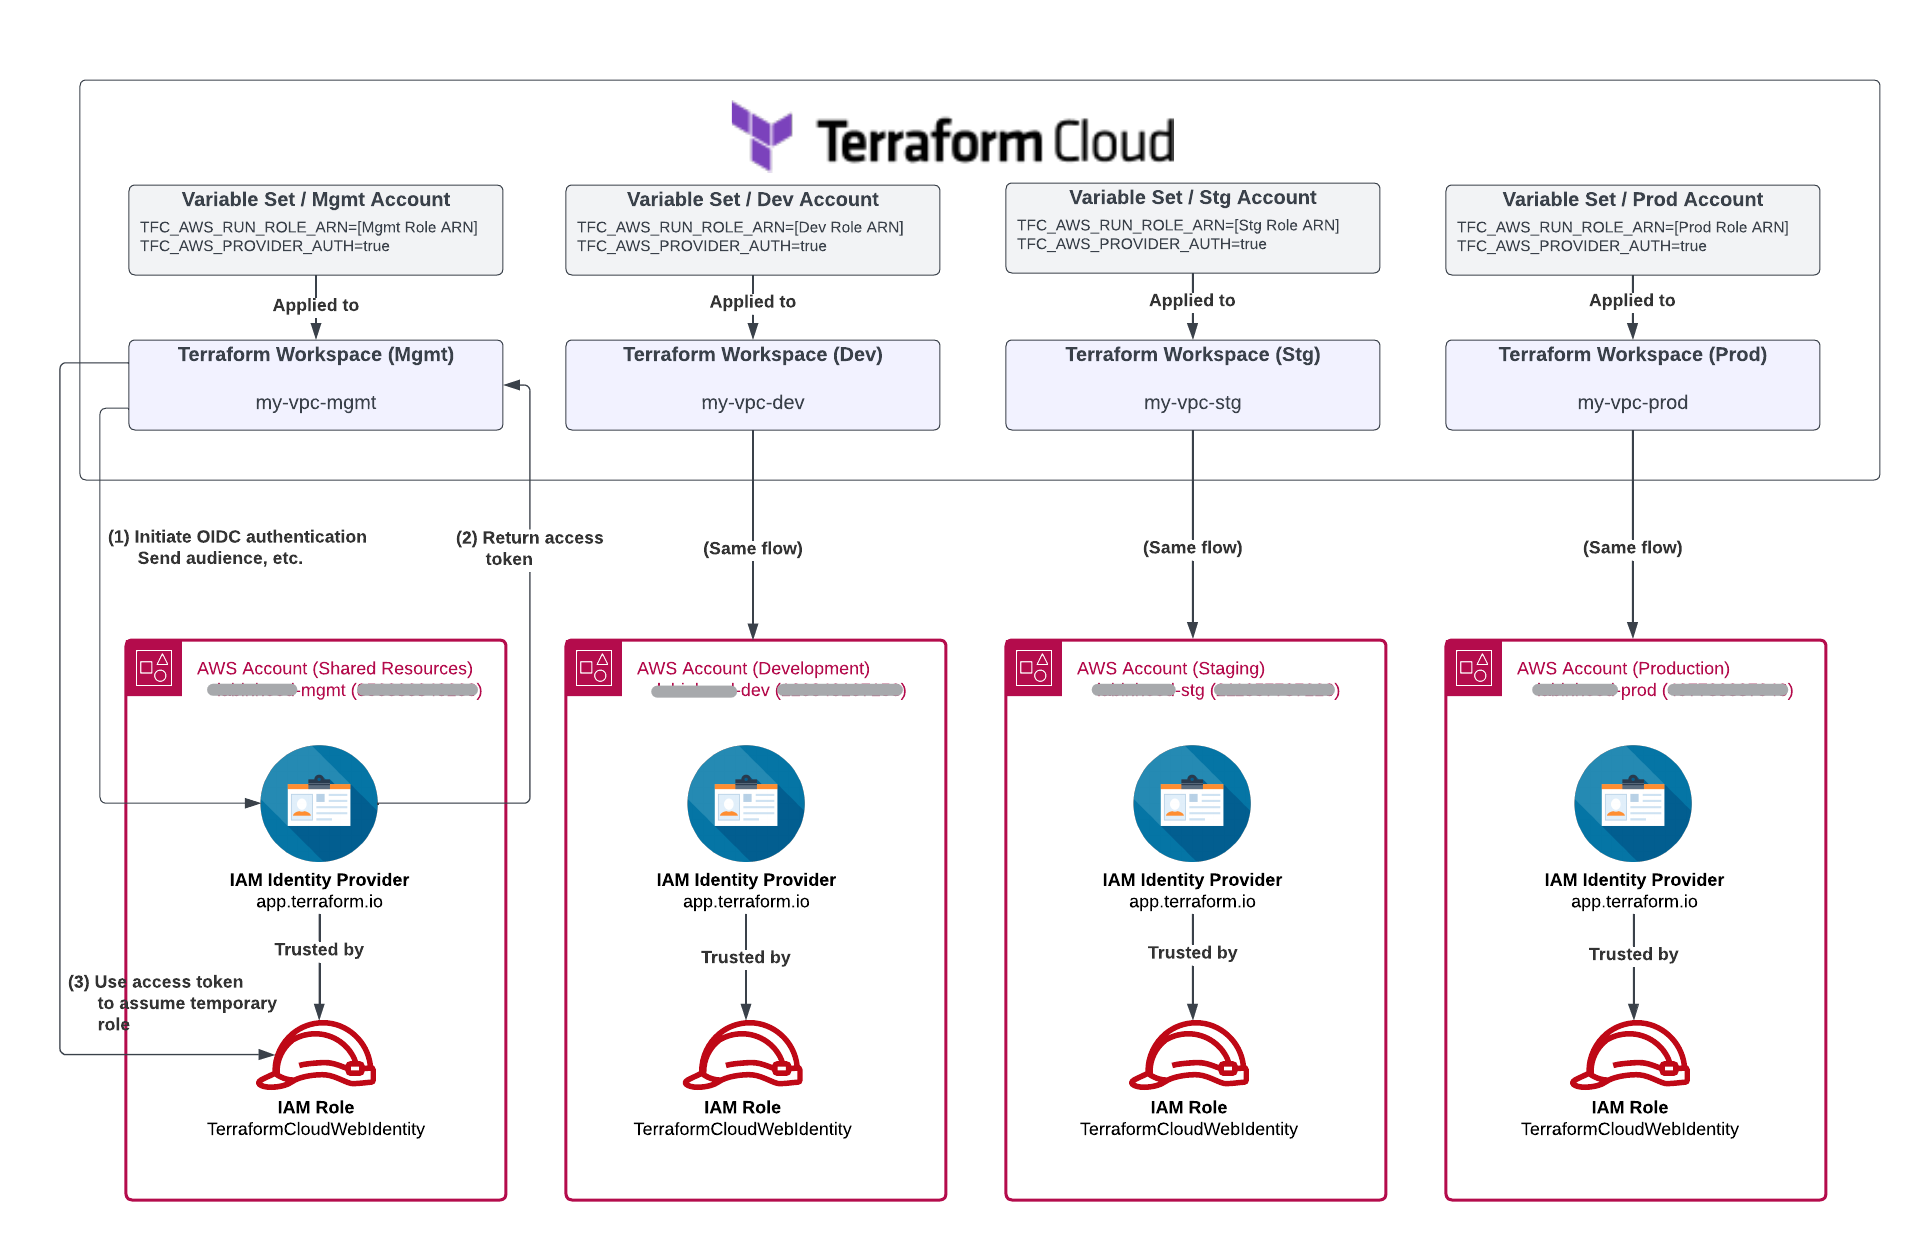
Fries With That? Yes, and Make it Multi-Account Please ..
This is how the same setup looks like when extended to multiple AWS accounts:
Conclusion
The Terraform Cloud and OpenID Connect (OIDC) configuration for AWS is straightforward (once you find the right documentation :))
In this article we walk through an example configuration, and provide references to the right documentation in both Terraform Cloud and AWS Websites for more advanced use-cases.
References
https://docs.aws.amazon.com/IAM/latest/UserGuide/id_roles_providers_create_oidc.html
https://developer.okta.com/blog/2019/10/21/illustrated-guide-to-oauth-and-oidc

Thank you, this article was very helpful!
Hi,
Why can’t we use very same workspace for multiple AWS accounts ?